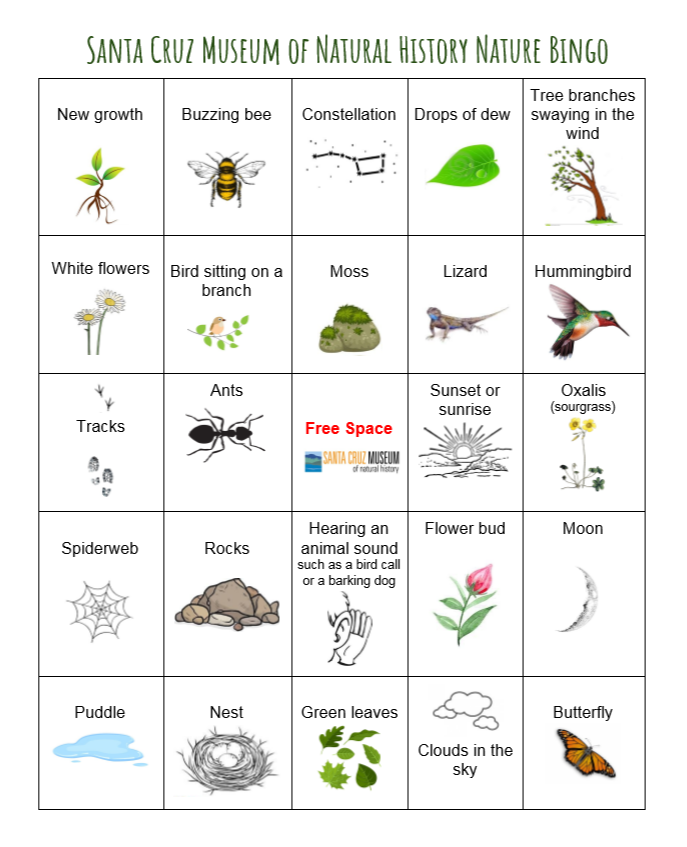
Play this bingo game during your time at home, yard, or neighborhood! Throughout the day stop to look out your window and see if you can find any of the things listed on the board. Try looking out all the windows in your house and at different times of day. Aim for 5 in a row, or find them all and call yourself a nature detective!
Take a tour through the Santa Cruz Museum of Natural History with our Museum coloring book! This booklet features many of our favorite exhibit features – from our tide pool and sea cow skeleton to our observation honeybee hive. Learn fun facts and bring some color into your Museum favorites!
Native people living along the Central California Coast practicing the Ohlone culture understood nature and responsibly stewarded resources for their survival. Do you know what it means to be a steward of nature? To be a steward is to take care of something. To be a steward of nature you first must understand nature and then you can learn how to care for it and preserve it for the future. In the past and today people have depended on natural resources to survive. Today we are going to learn about natural resources that were important to the Ohlone.
Matching Game This 20- to 30-minute activity is for students to learn about natural resources that were important to the Ohlone culture and reflect on natural resources that we rely on today. Students will look at photos and read descriptions of natural resources and match the resource with the artifact they think came from it. Students will check their own answers by reading facts about the artifacts. This activity was adapted for distance learning from the Ohlone Classroom Kit and was created for 3rd/4th graders.
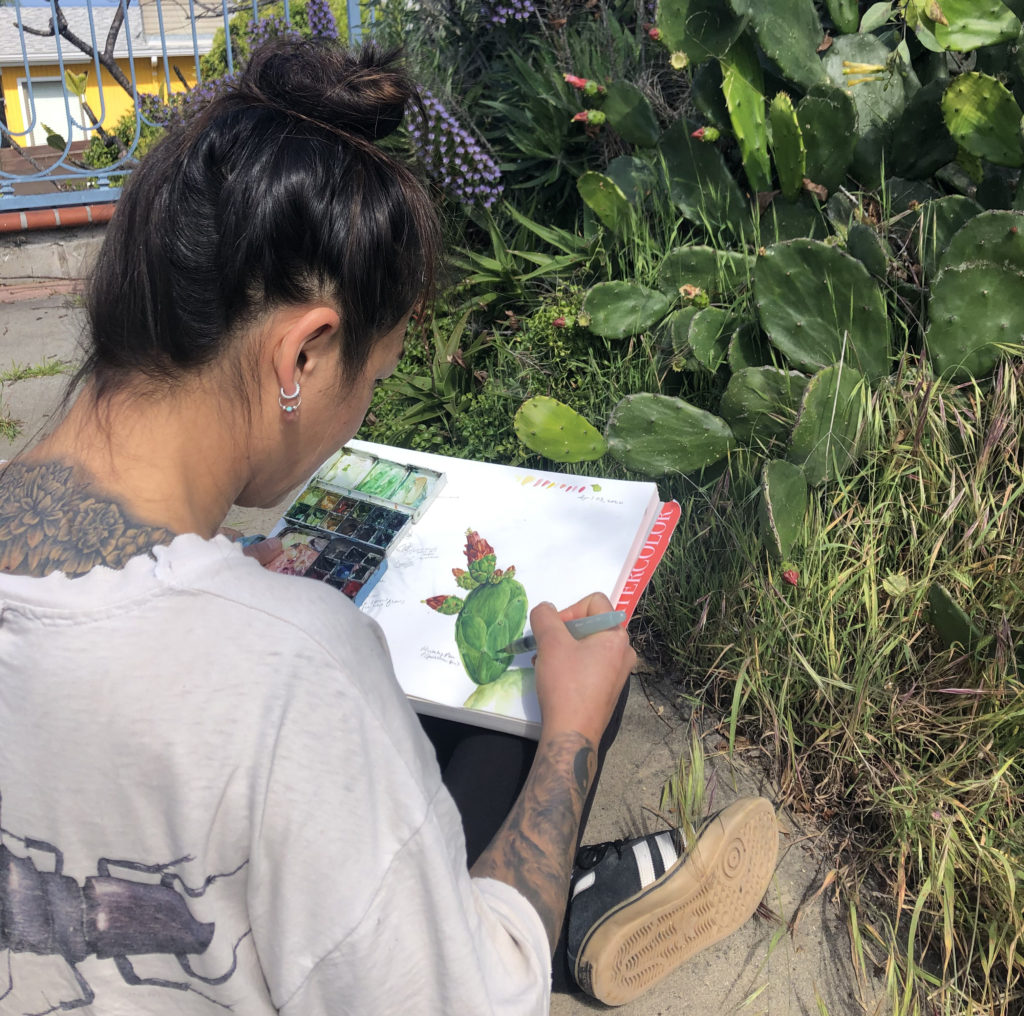
Explore science illustration with artists featured in our annual exhibit, The Art of Nature, and get tips for how to make your own science illustrations at home. This post is from Megan Gnekow, recipient of the Museum’s 2019 Laura Hecox Naturalist Award.
I make scientific illustrations because I want to inspire folks to look closely at the world around them. I want to make complexities and relationships more clear, helping people understand that all organisms are connected to each other. — Megan Gnekow
Prompt: Sequential Observations
There are so many great ways to use a nature journaling project to connect to your local habitat(s). One of my favorites is sequential observations — making notes and sketches about an organism you observe over time. Spring is a great time to do this because there are so many visible changes happening in our environments.
Choose an organism that you can observe regularly over a period of time (the period of shelter-in-place is a good place to start!). Observe the organism you have chosen as frequently as you are able to and make notes and sketches about what you observe. Note date, time, location (macro-habitat and micro-habitat). Use as many of your senses as you can and record what you learn!
Recording your observations over time gives you insights into an organism and the environment in which it lives. Hopefully this plants a seed for further observations and exploration. Don’t worry about making beautiful drawings. Just sketch and/or note what you observe!
If you can’t get outside or have other limitations to observing organisms, there are plenty of webcams available to inspire you — I would suggest a bird camera hosted by the Cornell Lab of Ornithology or the falcon cam at UC Berkeley.
Read more about Megan Gnekow here and visit her website here. Explore all of her illustrations from this peregrine falcon series here.
Dusting feathers, labeling fossils, freezing foxes. Checking conditions, inventorying subcollections, replacing boxes. Measuring shelves, sorting photos, scanning files. The steady hum of the dehumidifier over the muffled murmurings of distant meetings. Collections work lives at the intersection of the physical and the abstract, where a great deal of our time is devoted to the preservation of our specimens, objects, and artifacts so that they continue to be available for the creation of knowledge.
What then, is collections work when not at the museum?
A critical part of our ongoing efforts is the expansion of access to our collections through the process of digitization. So, on the eve of the shelter in place in order, collections assistant Isabelle West spent hours upon hours scanning as many of our undigitized ornithology catalog cards as she could so that we could continue this important work.
Digitization is the conversion of analog data to digital data. For many of us this is an easy definition. But collections are as diverse as their contents, and each museum must decide if their digitization work focuses on specimens and labels, or extends to field notes, accession records and more.
For us, digitization is twofold: It includes conversion of our foundational records, (catalog records and the accession paperwork that supports our ownership of our cataloged items) while building infrastructure and staff expertise in specimen photography. With the latter unavailable, the former becomes the focus.
Transcribing these cards, which at present focus on eggs and nests, Isabelle gets up close and personal with the ins and outs of decades of record keeping. This is one of her favorite parts about the process – getting to be part of the collaborative conversation that captures as many as three or four voices describing, updating, and inventorying information about this nest, or that clutch of eggs. She enjoys observing trends in collecting, like being able to see that almost all of our eggs were collected between 1880 and the mid 1890’s, or that the majority of the eggs were collected in June. Happily, her work means we’re headed to a place where museum patrons, researchers, and the wider public can also make observations about our data.
That data is critical to the value of scientific collections; the who-what-when-where details of collecting. A big challenge to creating good records, Isabelle points out, is when there is little to no data, or when what’s there presents puzzles like the red dot stickers that were used to signify that some form of fumigation treatment was applied to the specimen.
And while Isabelle is leading this charge, she’s not alone. Given the hundreds of records, record digitization is incorporated into all collections-related workflows. Recent projects include work by former intern Jordan Bakhtegan, who digitized and inspected specimens in our mollusk collection, and our ongoing ethnographic record digitization and review project led by Dr. Alirio Karina, PhD, whose scholarship interrogates practices of representation in ethnographic museums.
This process of digitization isn’t new to us – museum staff have undertaken various computerization projects over the years. Two of my favorite 80s-era relics are an IBM keyboard box used as temporary housing for a set of eggs in the teaching collections, and a brittle black binder entitled “Usage of Computers in Museum Collection” – both of which attest to the early interest of museum staff in taking advantage of the digital age. However, various efforts have fallen victim to different kinds of data decay – disks can get corrupted, databases can crash, and data input documents can get misplaced. A critical part of digitization is preservation, and our present commitment to collections stewardship is anchored, in part, on an industry standard collections management database, complete with physical and cloud backups, that unites all of our laboriously created collections data under one (digital) roof.
But stewardship is as much about sharing things as keeping them safe.
Historically we’ve done this through exhibits, pop ups, research appointments and more. More recently, we’ve added elements like the Laura Hecox Collections Guide or the Naturalist’s Scrapbook. Now that we are more aggressively pursuing digitization, we can also start looking at how to take part in the vibrant global conversation around the data mobilization or use.
As large scale data aggregators like the Global Biodiversity Information Facility (GBIF), Integrated Digitized Biocollections (iDigBio), Vertnet come into their second and third decades, researchers are reflecting not only on the history of digitized collections, but also the ways they are transforming how we ask questions about the world around us. An analysis of the past ten years of scholarship utilizing publicly accessible biodiversity databases richly depicts the triumphs and challenges of the field. Echoing UC Berkeley paleontology professor Charles Marshall on unlocking the value of fossil collections, we are excited for the ways that digitization will not only bring our collections into deeper conversation with the public, but also with the larger pursuit of knowledge.
Experiment with creating art from nature! Many plants and rocks have pigments inside of them that you can paint or draw with. You can even go one step further and try making your own paint brush from found natural materials!
How to find materials
Look in sidewalk cracks for leaves or flowers and look in dirt patches for different types of rocks. Look on bushes or trees for berries, flowers, and leaves. My favorite is oxalis, more commonly known as sourgrass (pictured to the right). It is a yellow flower that is common in Santa Cruz and makes a highlighter yellow color when used as natural paint. Bonus: this plant is invasive and is often considered a weed that you could completely remove.
Look in your kitchen for pigment materials!
On the other hand if you want to create art from nature but want to stay inside you can do that too! Some of your food can be used to paint and draw. For example, you can use colorful spices such as turmeric or paprika to create paint by mixing the powder with water. Beets, purple cabbage, and berries will also work – they often turn my cutting board different colors when I am chopping them! If you have a fireplace you can even use the small pieces of burnt wood that are left behind to draw with or you can grind it up and mix with water to create black paint.
Collecting plants
Be respectful of the plants you collect
Only take what you need or take less than 10% of a plant (If there are 10 leaves on the plant, take only 1 and find other plants to pick from if you need more)
Collect with permission on private property and do not collect in State Parks
Stay away from harmful plants such as poison oak and stinging nettle
Creating Paint
Use your hands or a spoon to grind up the plants or rocks
Try adding water or soaking items in warm water to soften them
Be patient, making your own paint is an experiment and it will often give you interesting surprises! See what happens if you add baking soda or vinegar- sometimes this will change the color of a paint!
Questions to ponder
What colors do you predict will be created from your items?
Did any of the colors surprise you? Why?
How did the colors change over time?
How did the colors change when you added different things (like baking soda or vinegar)?
As we enjoy the blooms of spring, we have many creatures to thank. Show us what you already know about pollinators by playing a matching game! Then go on a scavenger hunt to continue learning about pollinators around your home.
Preparation:
Print out Pollinator and Flower Sheets. Cut out cards. Fold each card at the middle line so one side shows the image and the other side shows the information. (you can tape, glue or staple so that it stays together).
Print out Pollinator Scavenger Hunt Data Sheet to use after the matching game
Matching Game: Show off what you know and match the picture of a pollinator with the picture of a flower you think they would be most attracted to. Check your answers using the information on the back of each image.
Go on a pollinator scavenger hunt! Look out your window or go outside into your backyard or neighborhood. Use your data sheet to record what you find.
There are many more pollinators in the world than are included in the pollinator matching game. What new pollinators do you notice? Take the time to look inside flowers and smell them too!
Choose one of the new pollinators you saw to learn more about. Then make your own pollinator card to add to the game!
You can use the pollinator and flower cards as a guide to make your own card.
Cut a piece of paper to match the size of the cards. Draw a picture of the pollinator one one side and then flip over to write facts from the links below on the opposite side.
Questions to think about: Have you heard of a pollinator? What do they do? What are some pollinators that you have seen before?
More Information Clickhere to learn more about pollination and pollinators Click here to learn how to help protect pollinators
When the sun goes down and we head to bed, a different world is waking up! We may be able to hear some of these creatures of the night “hoo-hoo-”ing to each other as they wake up and we turn inside. How do they live? What special features help them thrive in the dark? Take a closer look at the great horned owl and practice your naturalist skills of making observations and matching form to function.
In this 45-60 minute activity students will learn about the ways in which the great horned owl is able to survive in its habitat using its adaptations. Explore the resources below:
Great Horned Owl Bubo virginianus
Teacher’s Guide This guide helps to lead opening and follow-up discussions, and outlines NGSS connections.
Great Horned Owl Adaptations This guide provides a worksheet and powerpoint with thought provoking questions, facts, visuals, and videos to explore the many adaptations that owls have developed.
Owl Pellet and Food Wed Activity Guide Use the contents of an owl pellet to explore the concept of food webs and build one of your own with this set of worksheets and guides.
Beach cleanups are a way we can all enjoy the outdoors while serving our community. Whenever you’re walking along a beach, river, or other waterway, you can help keep it clean. While there’s a lot we can all do with reducing our own waste, cleanups can prevent some of it from going into our oceans. (As with all activities, remember to practice good social distancing!) Here’s what you need to know about conducting your own beach cleanup:
Helpful Tips and Suggestions
Never touch anything with your bare hands. Be sure you’re wearing gloves. As for me, I use gardening gloves. The best thing is that they are washable, so I can keep reusing them. I also recommend close toed shoes.
I use a bucket instead of a plastic bag to reduce my waste. A reusable shopping bag is also effective.
Do not touch anything sharp or organic. If you find dead animals or waste (poop), just leave it. If you find a biohazard, like a syringe, do not pick it up. If you want, you can call the police and tell them exactly where the biohazard is located, but you are not obligated to.
If you see any living wildlife, give it plenty of space and do not disturb it. Even if that elephant seal is sitting right on top of a piece of plastic, let it be. Also, remember that all Marine Mammals are protected under the Marine Mammal Act.
Both the city and the county of Santa Cruz have specific but different criteria for what constitutes trash or recycling. I highly recommend you take a look at those before you start your cleanup:
Pay attention to microplastics, or plastics that are smaller than 5 mm. Microplastics are by far the majority of the plastics that make it into our oceans. Just like larger pieces of plastics, any microplastic that gets ingested can’t be digested. And that’s not just for ocean animals. It’s estimated that we humans eat about a credit card’s size worth of plastic every week. Learn more here!
And lastly, remember to have a good time. Take a moment to enjoy the waves and the fresh air. We are so lucky to live in a place with gorgeous forests, a healthy ocean, and, most of all, with wonderful people.
Learn about different types of clouds, recording daily observations of clouds on your cloud chart, making weather predictions, and an experiment to make your own cloud at home!
What are clouds?
Clouds are made up of water droplets or ice crystals that float in the sky. We can learn a lot about the weather by looking at clouds.
Types of Clouds
Go outside and observe the clouds. Based on the diagram above, which clouds do you see today? If there are no clouds in the sky think about why that might be. Identify your clouds using this NASA Cloud Chart (Guía de las Nubes en español), and learn more about each type of cloud here.
Each day go outside and observe the clouds for one week and record your observations in this downloadable cloud chart. Make weather predictions based on what you have learned about different types of clouds. At the end of the week you can look back on your weather predictions and reflect on if they were correct or not. Use your data to see which clouds were most common during that week.
Download and print this worksheet to aid in your observations — or make your own!